How To Reinstall NPM and Node.js On Your System

Table of Contents
The Node Package Manager (usually shortened to npm) and Node.js are popular technologies among JavaScript developers. npm is the default package management utility that is installed automatically on your machine when you download and install Node.js.
npm assists in building, consuming, managing, and sharing small pieces of code. On the other hand, Node.js provides a server-side environment for creating powerful applications.
However, at times, npm can get corrupted, become incompatible with other programs, or just experience performance issues. In such cases, it may help to reinstall npm on your system and save yourself the hassles. Similarly, reinstalling Node.js may assist you in clearing out any performance errors.
And since npm is shipped with Node.js by default, installing Node.js will also install npm on your system.
In this article, you’re going to learn how to reinstall npm and Node.js on different operating systems—Windows, macOS, and Linux.
How to check if reinstallation succeeded
Note that after completing the reinstallation process, you can check if it was successful by running the following commands on the terminal:
node –v  #check Node.js version

npm –v   #check npm version
Then, if everything went well, the system will output your installed versions.
Something like this:
v12.18.0  #installed Node.js version

6.9.0     #installed npm version
Since npm is usually updated more frequently than Node.js, your installation may not come with the latest npm version.
So, if your installed npm version is not the latest, you can update it by running the following command:
npm install npm@latest -gThe above command will install the latest, stable npm version. However, if you want to experiment with things by using a version that will be released in the future, you can run the following:
npm install npm@next -gIf you want to update Node.js to the latest version, you can read this article.
How to reinstall npm and Node.js on Windows
If the npm or Node.js running on your Windows environment is broken, you can reinstall and get the most out of them.
You can use any of the following methods:
- Reinstalling using a Node version manager
- Reinstalling using a Node installer
Let’s talk about each of them.
a) Reinstalling using a Node version manager
A Node version manager is a tool you can use to install various versions of Node.js and npm and shift between them seamlessly.
A popular Node version management tool you can use is nvm-windows. It’s a powerful command line utility that allows you to manage multiple installations of Node.js comfortably.
Before installing the utility, it is recommended to remove all the existing versions of Node.js and npm from your Windows computer. This will prevent any conflict issues when installing the software.
You can uninstall them by doing the following:
- Go to the Windows Control Panel and uninstall the Node.js program.
- If any Node.js installation directories are still remaining, delete them. An example is C:\Program Files\mynodejs.
- If any npm install location is still remaining, delete it. An example is C:\Users\<username>\AppData\Roaming\npm.
Then, once your system is clean, go to this page and download and run the latest nvm-windows installer. After it has been installed, you can start the Command Prompt or Powershell as an Administrator and use the tool to reinstall Node.js and npm.
If you want to reinstall a specific Node.js version, you can run the following command:
nvm install <version-number>Let’s say you want to reinstall Node.js version 12.18.0, you can run:
nvm install 12.18.0If you want to reinstall the latest stable Node.js version, you can run:
nvm install latestIf you want to check the list of Node.js versions available for download, you can run:
nvm list availableTo use the installed Node.js version in your project, you can switch to it:
nvm use 12.18.0b) Reinstalling using a Node installer
Using the official Node installer is the easiest way to reinstall Node.js and npm on your Windows environment.
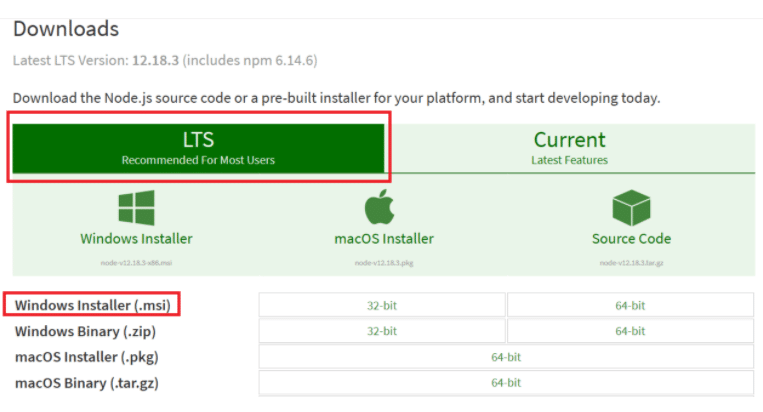
To use this option, you can go to the Node.js download page and reinstall the latest Node.js version.
It is recommended to download the version labeled LTS (Long-term Supported) because it has been tested with npm. Although the version labeled Current comes with the latest features, it may be unstable and unreliable.

After selecting the version you want to download, and clicking the Windows Installer option, the installation wizard will magically complete the installation process for you.
Ultimately, the installer will automatically overwrite your existing, malfunctioned Node.js version with a new one.
How to reinstall npm and Node.js on macOS
Before reinstalling Node.js and npm on your macOS system, you’ll need to remove any previously installed versions.
Here are some ways you can use to uninstall them:
- Manually—this involves manually removing any references of Node and npm from your system. Unfortunately, this process is difficult since there may be several directories with Node resources. For example, you may need to delete the node executable and node_modules from /usr/local/lib, delete .npm from the home directory, and delete many other directories.
- Using a script—this involves running a script to uninstall Node.js and npm automatically from your macOS system. You can find a simple script to use here.
- Using Homebrew—this package management utility lets you complete the uninstallation process fast and easily. You can run the following command:
brew uninstall nodeThen, once your system is clean, you can use any of the following methods to reinstall Node.js and npm on macOS:
- Reinstalling using a Node installer
- Reinstalling using Homebrew
- Reinstalling using a Node version manager
Let’s talk about each of them.
a) Reinstalling using a Node installer
To use the official Node installer for reinstalling the tools, go to the Node.js download page and select the version you want to install—just as we described previously.
Remember to choose the macOS installer option. If you run the installer, it will complete the reinstallation process for you automatically.
b) Reinstalling using Homebrew
To reinstall using Homebrew, just run the following command on the macOS terminal:
brew install nodec) Reinstalling using a Node version manager
You can also reinstall the two tools using the nvm Node version manager. Since the process for using nvm is the same for both macOS and Linux, we’ll describe how to use it in the next section.
How to reinstall npm and Node.js on Linux
Just like in the previous cases, you’ll need to remove any installed version of Node.js and npm before reinstalling them on a Linux distribution, such as Ubuntu.
Here are some ways you can use to uninstall them:
- Using the apt package manager—you can remove Node.js by running the following command:
sudo apt remove nodejsThe above command will delete the distro-stable version while retaining the configuration files for later use. However, if you intend to remove the package as well as its configuration files, run the following:
sudo apt purge nodejsFinally, you can delete any unused packages that were installed automatically with the deleted package:
sudo apt autoremove- Using nvm—you can also use the nvm Node version manager to uninstall Node.js from your system. We’ll illustrate how to do this in the next section.
Then, once your machine is clean, you can use any of the following methods to reinstall Node.js and npm on Linux:
- Reinstalling using a Node version manager
- Reinstalling using the apt package manager
Let’s talk about each of them.
a) Reinstalling using a Node version manager
As earlier mentioned, you can use the nvm Node version manager to reinstall Node.js and npm on both macOS and Linux.
To install the script-based tool, you can use either Wget or cURL.
If using Wget, execute the following on the terminal:
wget -qO- https://raw.githubusercontent.com/nvm-sh/nvm/v0.35.0/install.sh | bashIf using cURL, execute this:
curl -o- https://raw.githubusercontent.com/nvm-sh/nvm/v0.35.0/install.sh | bashThe above commands will install nvm version 0.35.0 on your system. Remember to check the latest version and refer to it accordingly on the command you want to run.
To verify if it was installed successfully, run the following:
command -v nvmIf all went well, it would output nvm.
After installing nvm, you can use it to reinstall Node.js on your system.
Simply, execute the following command:
nvm install nodeTo reinstall a specific Node.js version, run:
nvm install <version-number>For example, to reinstall Node.js version 12.18.0, execute:
nvm install 12.18.0Once reinstallation is complete, you can set that Node.js version for use as the system-wide default version:
nvm use 12.18.0Furthermore, you can check the list of Node.js versions available for download by executing the following:
nvm ls-remoteTo remove a Node.js version that you’ve set up using nvm, start by establishing if the version is currently active on your system:
nvm currentIf it is not actively running, execute the following to uninstall it:
nvm uninstall <version-number>On the other hand, if the version targeted for removal is the current active version, you’ll need to deactivate nvm first:
nvm deactivateThen, you can use the above uninstall command to remove it from your system.
b) Reinstalling using the apt package manager
A simpler way to reinstall Node.js and npm on a Linux distribution, such as Ubuntu, is to use the apt package manager.
To do so, you can start by refreshing your local package index:
sudo apt updateThen, reinstall the distro-stable Node.js version from the repositories:
sudo apt install nodejsIn most cases, this is all you need to get up and running with Node.js. Also, you may want to reinstall npm by running the following command:
sudo apt install npmConclusion
That’s how to reinstall npm and Node.js on Windows, macOS, and Linux.
After completing the reinstallation, you’ll avoid any performance issues that often arise from using malfunctioned versions of the technologies.
Are you letting open-source vulnerabilities go undetected?
Mend Bolt is a powerful free extension that operates in real-time to provide visibility over your open source components within Azure Pipelines or GitHub.
- Get real-time alerts on security vulnerabilities
- Ensure the license compliance of open source components.
- Receive automated open-source inventory reports for every build or project.
Get it now and join thousands of developers who’ve already gained full visibility over their open-source components.


